If you’re using a GLP‑1 injection for weight management or diabetes, you may be wondering:
Where to inject GLP‑1 in the thigh?
This guide explains safe injection locations, techniques, tips for rotation, possible side effects, and answers to common questions. Whether you’re new to injectable therapies or simply need precise guidance, this blog walks you through everything you need to know about thigh injections.
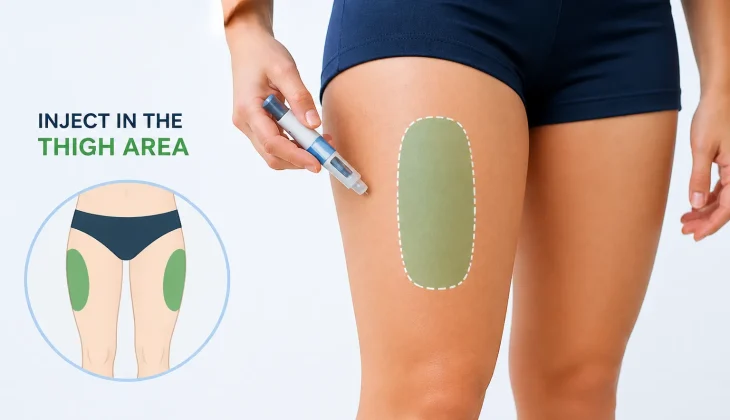
Injecting GLP‑1 in the thigh is a safe and effective method for self-administered therapy. The outer front of the thigh, specifically the middle portion between the hip and knee, is the most recommended area. This location provides adequate subcutaneous fat, making it easier to deliver the medication without hitting muscle tissue.
Before injecting, ensure the site is clean by washing your hands and swabbing the area with alcohol. Using a gentle pinch technique can help lift the fatty layer and make the injection smoother. Always insert the needle at the correct angle, typically 45–90 degrees, depending on needle length and body type.
After the injection, apply gentle pressure for a few seconds but avoid rubbing, which may irritate the skin. Rotating injection sites along both thighs helps prevent lumps, bruising, and skin hardening. Many patients find that marking or mentally mapping injection zones keeps rotation consistent. Over time, thigh injections become a straightforward routine with minimal discomfort. For best results, follow your healthcare provider’s instructions on dosage and site selection.
Regular observation of the site can alert you to any unusual reactions early. By following these steps, thigh injections can be both safe and efficient for ongoing GLP‑1 therapy.
1. Introduction to GLP‑1 Injections
GLP‑1 injections are a modern therapy designed to help regulate blood sugar and support weight management. These medications mimic the natural hormone GLP‑1, which signals the body to release insulin, reduce glucagon, and control appetite.
They are commonly prescribed for people with type 2 diabetes or those looking to manage obesity. Administered subcutaneously, GLP‑1 injections work by slowing stomach emptying and promoting a feeling of fullness, which can help reduce calorie intake. Popular GLP‑1 medications include semaglutide and liraglutide, available in pen devices for easy self-administration.
Choosing the right injection site, like the thigh, abdomen, or upper arm, can improve comfort and absorption. With proper technique, these injections can become a simple part of a daily routine. Understanding how to use GLP‑1 safely ensures maximum effectiveness while minimizing side effects.
GLP‑1 receptor agonists (like semaglutide and liraglutide) are injectable medications used to:
- Help regulate blood sugar
- Reduce appetite and support weight loss
- Improve insulin response
Common examples include Wegovy, Ozempic, Saxenda, and Victoza. These are typically injected subcutaneously — into the layer of fat just under the skin.
When administering GLP‑1, the thigh is one of the approved injection sites.
2. Why the Thigh Is a Good Injection Site?
The thigh is one of the most convenient and reliable sites for GLP‑1 injections. Its large surface area makes it easy to access, even for self-administration, without needing assistance. The outer front portion of the thigh has a sufficient layer of subcutaneous fat, which ensures the medication is absorbed properly while avoiding muscle tissue.
Many patients find that injecting in the thigh causes less discomfort compared to other areas like the upper arm. The thigh also allows for easy rotation, reducing the risk of bruising, lumps, or skin irritation. Unlike the abdomen, which some people may feel self-conscious about, the thigh offers privacy during injections. Properly pinching the skin and using the correct needle angle ensures a smooth and effective injection.
Over time, patients often report that thigh injections become routine and manageable with minimal pain. Using the thigh as a regular site can help maintain consistent medication absorption and optimize the benefits of GLP‑1 therapy.
The thigh has several benefits for GLP‑1 injections:
- Easy to access on your own
- Less sensitive than some areas
- Adequate subcutaneous fat layer
- Consistent absorption rates
However, proper site selection and rotation are still important to avoid irritation and ensure consistent delivery.
3. Where to Inject GLP‑1 in the Thigh? (Precise Locations)
For precise thigh injections, target the outer front area of the thigh, roughly in the middle between the hip and the knee. Avoid the inner thigh, which is more sensitive and prone to irritation. Focus on subcutaneous tissue rather than muscle to ensure proper absorption.
Always clean the area with an alcohol swab before injecting, and use a gentle pinch to lift the fatty layer. Rotating slightly within this zone each time helps prevent lumps, bruising, and uneven absorption.
Preferred Area
The recommended area for thigh injections is the outer front of the thigh, specifically:
- Middle third of the thigh
- Between the hip and the knee
- Avoid the inner thigh, where sensitivity and irritation may be higher
This Infographic shows the precise thigh injection zones and proper technique for safe GLP‑1 administration.

Key Points for Safe Injection:
- Use the front, outer thigh (vastus lateralis area).
- Avoid the inner thigh and areas very close to the hip or knee joints.
- Ensure hands and the injection site are clean.
4. Step‑by‑Step Injection Technique (Thigh)
To inject GLP‑1 into the thigh safely, start by washing your hands thoroughly and cleaning the injection site with an alcohol swab. Gently pinch the skin to lift the subcutaneous layer, which helps prevent injecting into muscle.
Insert the needle at a 45–90 degree angle, depending on your body type and needle length. Press the plunger slowly and steadily to deliver the full dose. After the injection, leave the needle in place for a few seconds before removing it to ensure complete medication delivery. Apply gentle pressure with a cotton ball or gauze, but avoid rubbing the area.
Finally, rotate your injection spot slightly for the next dose to reduce the risk of bruising, lumps, or skin irritation.
Before You Inject
- Wash your hands thoroughly with soap and water
- Prepare your GLP‑1 pen or syringe
- Clean the skin with an alcohol swab and let it dry
Injection Steps
- Pinch the skin gently between your thumb and forefinger.
- Insert the needle at a 45° to 90° angle, depending on the needle length and your body.
- Inject slowly and steadily.
- Wait 5–10 seconds before removing the needle to ensure full dose delivery.
- Apply gentle pressure with a cotton ball — do not rub the site.
5. Why Site Rotation Matters
Rotating your injection sites is essential to maintain healthy skin and ensure consistent absorption of GLP‑1 medication. Repeatedly injecting in the same spot can lead to lipohypertrophy, which are small lump or fatty deposit under the skin.
These lumps can make future injections uncomfortable and interfere with proper medication absorption. By rotating sites along the thighs — moving slightly up, down, or to the other leg — you allow the skin to heal and reduce irritation. Rotation also helps prevent bruising and redness from repeated injections.
Many patients find it helpful to keep a mental map or mark areas with a washable pen to ensure proper rotation. Regularly changing injection spots contributes to a more comfortable experience and maximizes the effectiveness of GLP‑1 therapy.
Rotating your injection location every time helps prevent:
- Bruising
- Lumps or fatty deposits (lipohypertrophy)
- Irritation
- Scar tissue buildup
Rotation Tips
- Alternate sides (left thigh → right thigh)
- Change vertical position
- Keep a consistent grid and avoid re‑injecting in the exact same spot
6. Comparison: Thigh vs. Abdomen vs. Upper Arm
Here’s a quick reference:
| Injection Site | Ease of Access | Sensitivity | Absorption Consistency | Best For |
| Thigh | ⭐⭐⭐ | ⭐⭐ | ⭐⭐⭐ | Self‑administration, consistent layer |
| Abdomen | ⭐⭐⭐⭐ | ⭐⭐ | ⭐⭐⭐⭐ | Fast absorption, easy rotation |
| Upper Arm | ⭐⭐ | ⭐⭐⭐ | ⭐⭐ | With assistance or mirror |
- Stars are relative; higher means better in that category.
- All sites are valid if performed correctly, but the thigh remains a top choice for many because of accessibility.
7. Tips for a Comfortable Thigh Injection
To make thigh injections as comfortable as possible, start by relaxing your leg muscles before inserting the needle. Ensure the medication is at room temperature to reduce stinging. Use a new, sharp needle each time, and pinch the skin gently to lift the subcutaneous layer. Insert the needle at the correct angle, and inject the medication slowly and steadily.
Avoid rubbing the site afterward, as this can cause irritation or bruising. Applying a cold compress beforehand or afterward can also help minimize discomfort. Maintaining a consistent site rotation schedule ensures the skin stays healthy and reduces the risk of lumps or soreness. Over time, these simple practices make thigh injections routine and manageable.
✔️ Relax your muscles instead of tensing them
✔️ Warm the medication to room temperature
✔️ Use a new needle each time for hygiene and comfort
✔️ Avoid injecting over scars, bruises, or irritated skin
8. Common Side Effects at the Injection Site
Mild side effects at the thigh injection site are common and usually temporary. Many people experience redness, swelling, or slight tenderness immediately after the injection. Some may notice itching or a small bruise that resolves within a day or two.
Rarely, a small bump or lump may form under the skin, which typically disappears over time. These reactions are often minimized by rotating injection sites and using proper technique. Applying gentle pressure or a cold compress can help reduce discomfort.
Avoid rubbing the area, as it can worsen irritation. If you notice persistent pain, significant swelling, or signs of infection such as pus or warmth, contact your healthcare provider promptly. Monitoring your injection sites regularly helps ensure safe and effective GLP‑1 therapy.
This infographic highlights the common side effects you may notice at GLP‑1 injection sites and offers tips to reduce discomfort safely.

It’s normal to experience some mild reactions:
- Redness
- Slight swelling
- Mild pain or itching
These usually resolve within a few hours. If you notice severe pain, large swellings, or signs of infection (pus, fever), contact your healthcare provider.
8. What if I’m Nervous About Injecting in the Thigh?
Feeling nervous about thigh injections is completely normal, especially for first-time users. Start by practicing with a demonstration pen or water to build confidence. Using a mirror can help you see the injection site clearly and reduce anxiety. Take slow, deep breaths before and during the injection to stay relaxed. Listening to music or distracting yourself can also make the process easier.
Asking a friend, family member, or nurse to demonstrate the first few injections can boost confidence. Over time, most people find that thigh injections become routine and far less intimidating.
Many people have initial anxiety. These tips can help:
- Practice with water injections in the mirror
- Use distraction (music or breathing exercises)
- Ask a friend or nurse for initial demonstrations
- Visualize the process step‑by‑step
With time, most users find thigh injections quite manageable.
9. Can I Inject in the Same Area Every Time?
It’s not recommended to inject GLP‑1 in the same spot every time. Repeated injections in one area can lead to lipohypertrophy, which is a lump or fatty deposits under the skin. These lumps can make injections uncomfortable and may affect how the medication is absorbed. To prevent this, rotate your injection sites slightly each time — either moving up, down, or to the opposite thigh.
Keeping a mental map or marking areas with a washable pen can help maintain consistent rotation. Regularly changing sites also reduces the risk of bruising, irritation, and skin thickening. Following a rotation schedule ensures a safer and more effective GLP‑1 injection routine.
No. Repeated injection at the same exact location can cause:
- Lipohypertrophy (fat lumps under skin)
- Pain
- Erratic medication absorption
Always move at least an inch away from prior sites.
10. How Deep Should I Inject in the Thigh?
GLP‑1 injections are designed to be subcutaneous, which means they should go into the layer of fat just beneath the skin, not into the muscle. To achieve this, gently pinch the skin before inserting the needle, which lifts the subcutaneous tissue away from the underlying muscle. Most GLP‑1 pens come with short needles specifically sized for subcutaneous injection. The insertion angle typically ranges from 45 to 90 degrees, depending on your body type and the needle length.
Proper depth ensures the medication is absorbed consistently and reduces the risk of pain or bruising. Avoid pressing too hard or injecting too deeply, as this can cause discomfort and affect effectiveness. Following the manufacturer’s instructions and guidance from your healthcare provider helps maintain proper injection depth.
GLP‑1 injections are subcutaneous:
- Insert into the layer of fat just under the skin
- Not deep into the muscle
Pen devices and short needles are designed to help you target the correct layer easily.
11. Daily Checklist for Thigh Injections
Following a daily checklist can make GLP‑1 thigh injections safer and more consistent. Start by washing your hands thoroughly and cleaning the injection site with an alcohol swab. Check your pen or syringe to ensure it’s ready and the correct dose is set. Pinch the skin gently to lift the subcutaneous layer before inserting the needle at the recommended angle. Inject the medication slowly and wait a few seconds before removing the needle.
Apply gentle pressure with a cotton ball or gauze, but avoid rubbing. Record or mentally note your injection site to maintain proper rotation. Finally, safely dispose of the needle in a sharps container to prevent injury. Sticking to this routine helps ensure comfort, safety, and consistent absorption of GLP‑1 medication.
Use this checklist every time:
☑ Wash hands
☑ Clean site
☑ Pinch skin gently
☑ Inject at the correct angle
☑ Dispose of needle safely
☑ Rotate injection site
Signs You’re Doing It Right
- Minimal pain
- No large lumps
- Quick healing
- Predictable medication effects
Safety and Needle Disposal
✔ Use a sharps container
✔ Never reuse needles
✔ Keep out of reach of children
Proper disposal reduces the risk of injury or infection.
Conclusion
Injecting GLP‑1 in the thigh is a safe and effective way to manage weight and blood sugar when done correctly. The outer front area of the thigh provides an accessible site with adequate subcutaneous tissue for consistent absorption. Following proper technique, cleaning the site, and using a gentle pinch ensures minimal discomfort. Rotating injection sites prevents lumps, bruising, and skin irritation, helping maintain healthy skin over time.
Paying attention to needle depth and angle improves effectiveness and comfort. With practice, thigh injections become a straightforward part of your routine. Regularly monitoring your injection sites and following safety tips helps maximize the benefits of GLP‑1 therapy. By staying consistent and careful, you can make injections easier and more effective for long-term results.
So, to answer your core question:
Where to inject GLP‑1 in the thigh?
The optimal location is the outer front of the thigh, focusing on the middle third between the hip and knee.
Following proper technique and rotating sites leads to better comfort and consistent medication action.
Your thigh injections can be safe, easier than you think, and a reliable part of your GLP‑1 routine.
Frequently Asked Questions (FAQs)
1. Where exactly in the thigh should I inject GLP‑1?
The outer front of the thigh (middle third between hip and knee) is preferred.
2. Is the thigh a good injection site for GLP‑1?
Yes — it’s convenient, accessible, and has adequate subcutaneous tissue.
3. Can I use the same spot every day?
No — rotate sites to avoid skin problems.
4. Does injecting in the thigh hurt more than the abdomen?
Pain levels vary by person; both sites can be comfortable with proper technique.
5. Should I massage after the injection?
No — massaging can cause uneven absorption; use gentle pressure only.
6. How long should I wait between injections at one site?
Wait at least several days and move at least 1 inch from the last spot.
7. Can I inject while standing?
Yes, as long as you can reach and see the area safely.
8. What if I bruise at the site?
Minor bruising is common; use ice and avoid that area next time.
9. When should I contact a doctor?
If you have severe pain, infection, or unusual lumps that don’t go away.